
Ap.Setup-Wavlink Extender Setup-Comfast Extender Setup-Ap Extender Setup
WAVLINK AP EXTENDER CONFIGURATION
When it comes to the ap.setup web URL, it will only work if a user is attempting to connect to a Wavlink, Comfast, or Dodocool extension. As a result, if a user tries to view the Ap extender setup normally, this page will not load.
We may now talk about how to access the Ap wifi extender manual setup page:
- Remove the extension from the package and plug it into a power outlet.
- Wait for the power LED light to turn green after pressing the power button.
- Connect your wifi device to the _Ext network using the Ap extender configuration.
- Now open any web browser and type Ap.setup into the address bar.
- You’ve arrived at the Wavlink Extender Setup configuration page.
- Create an account with AP Login and follow the instructions.
The ap.setup web url for the Wavlink extender login page is used to connect/install the wifi range extender. If you’re trying to connect your Wavlink wifi range extender to your main modem or router, it won’t work.
To use the Wavlink wifi range extender, follow the steps below:
Manual Method for Setting Up a Wavlink Range Extender
Let’s take a brief look at how to install Wavlink extender using the manual method:
- Connect your Wavlink extender to your main router or modem.
- When you see the firm power light on the extension, you’re ready to go.
- Take out any wifi-enabled gadget, such as a phone, tablet, or laptop.
- After that, go to your wifi device’s settings and select the wifi option.
- Wavlink Extender Setup Ext will appear as a network name.
- When you’ve connected to the ‘EXT’ network,
- Type ap.setup into the address bar of any web browser.
- On the screen, you’ll notice a new extension setup page.
- To install/connect the extender, follow the AP Extender Setup instructions.
WPS Method for Wavlink Extender Setup
One of the simplest ways to connect the extender to an existing wifi network is to use the wireless protected setup ( W.P.S ) button.
To install the extender, follow the procedures below:
- The extender should be placed close to the main wifi modem or router as the initial step.
- Connect the Wavlink wifi range extender to the internet and turn it on.
- Wait for the power lead to turn solid green before proceeding.
- Push the W.P.S button on the extender once you’ve gotten the power led light.
- Now go to your router/modem and press the W.P.S button on the router/modem.
- A blinking green light will appear on your router and extension.
- Allow 1-2 minutes for the extension to sync with the home wifi system.
- The configuration of the Wavlink extender has been completed successfully.
- To complete the installation procedure, go to Ap.setup.
Setup of a ComFast Range Extender | Manual Method
Comfast wifi Extender Manual: Step-by-Step Instructions:
- Connect the wifi device to the COMFAST Extender.
- Open a new window and type 192.168.10.1 or ap.setup into the address bar.
- Access the setup page by entering the default login and password.
- The repeater looks for signals that are close by.
- Go to your wifi network at home and select it.
- Now type in your wireless password and click Next.
- Wait 30 seconds for your booster to sync with your home router.
- The installation of Ap Extender is now complete.
- Connect the extension to a dead internet area for improved connectivity.
WPS Method for COMFAST Extender Setup
Step-by-step instructions for connecting the extension to the w.p.s method:
- To begin, position the Comfast wifi range extender close to the primary router or modem.
- Connect the Comfast extender to a power outlet.
- Wait until the power led lights solidify.
- Now, on the extender, press the W.P.S button.
- Then, on the main router, press the W.P.S button.
- Allow 10-15 seconds for the two devices to sync.
- On the Comfast booster, the router led light will now turn solid.
- To finish the installation, go to Ap.setup.
- Place the wifi booster in the preferred spot once the configuration is complete.
The main function of the ap setup extender
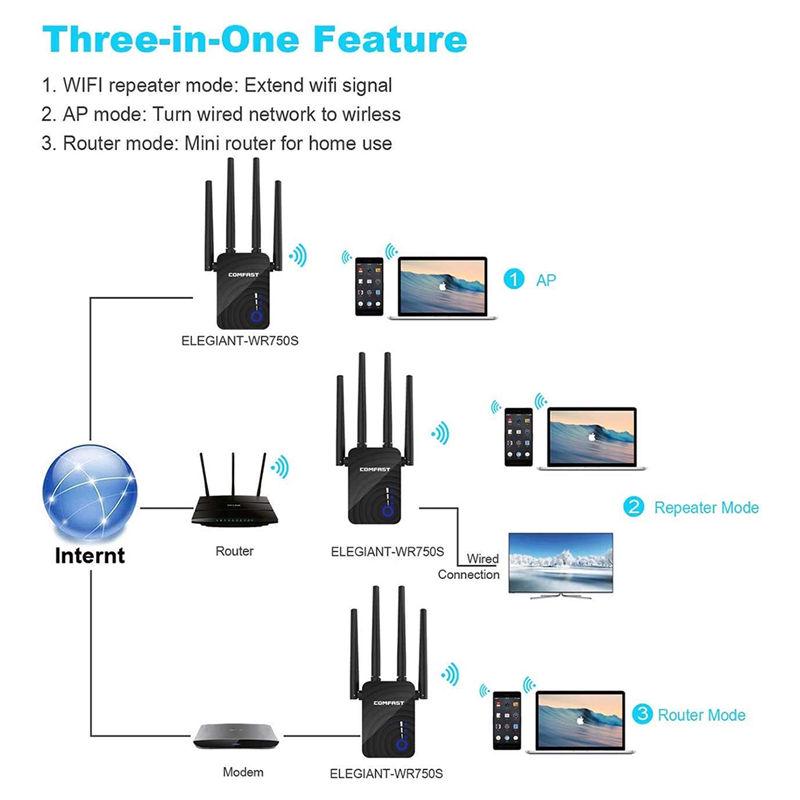
The extender’s main purpose is to increase wifi signals to the remote corners of your home or office. Not to make your existing wifi network faster. You may get a variety of brand extenders at your local store, such as Wavlink, Dodocool, and Comfast wifi range extenders in various versions. So choose your wifi booster based on the size of your home or the distance you wish to cover. A user can select from a variety of extender models.
It’s simple to set up an Ap wifi range extender using the ap.setup web URL or the 192.168.10.1 IP address. A user simply needed a wireless device, such as a laptop, tablet, or phone, and some technical knowledge to install the extender manually. If you are unable to access or log into the Ap range extender configuration page, please contact us. Not to worry, we have qualified specialists available 24 hours a day, 7 days a week to assist you with any wireless booster concerns.
So let’s discuss how to access the Ap extender setup page:
- Switch the wireless repeater to repeater mode after turning it on.
- Use a laptop or a tablet when the power light is on.
- Connect to the EXT network using the Wi-Fi settings option.
- Open any online browser, such as Mozilla Firefox, Google Chrome, or Microsoft Edge, once connected.
- In the address box, type https://Ap.setup.
- You’ll be taken to the new extension setup page.
apsetup login